Pages

Showing posts with label card. Show all posts

Friday, August 30, 2013

My New Website!!! Bright and Merry Designs

Hello all!
I am so excited to announce that I FINALLY have a website!  I have been wanting to do something like this for a VERY long time but just have not had the confidence to go for it.  Well, I WENT for it and Bright and Merry Designs was born!
You can visit me on Facebook at https://www.facebook.com/BrightMerryDesignsByJanaBailey and also on Pinterest at http://pinterest.com/janambailey/bright-and-merry-designs/.  I hope you would be kind enough to "like" my Facebook page and to pin some of my Pinterest pins to help me get the word out.

Some of the fun things you will find on my website currently are card sets that are prints made from my original art.  Last year I made the set below at the encouragement of my sweet husband after making small paintings for 5 of my girlfriends that I sing in an ensemble with.  Well, they were a big hit and sold really well.  My friends encouraged me to create more cards this year and boy did I!  I now have a total of 3 Christmas card sets and a Birthday card set.
 This set is called Christmas Portraits.  I imagined what it might be like if Christmas characters had to sit down for school portraits!  The thought kind of cracked me up :)
 This set is called Christmas Whimsy - more portraits really but I threw in a Christmas tree!
This set is my favorite, it is called Christmas Nativity.  I used words from Christmas songs and one of my favorites of all time is "Mary Did You Know?"  Just the thought of how Mary would have felt if she only knew what all Jesus would do and what all He would go through just for us.
Then there is my cheerful Birthday set.  I love this one!  It makes me smile. :)

Eventually I will be offering small prints of each of these little gems on the website also.  Some other things I will be offering are 5 x 7 and 8 x 10 prints from some of my larger original paintings.  Here are just a few, you can see more on the website.
 Beatitudes - This was inspired by my pastor who recently preached a whole series on the Beatitudes out of Matthew 5.  All of the qualities God wants us to possess are in white with all the blessings you will receive written in the background.
 Bless This House - just a little fun and funky painting to help us remember God's grace and that He wants us to seek His blessings.
 Me and My House - Joshua 24:15 - One of my all time favorite verses.  We have had this verse in our home in one form another for most of our 24 years of marriage.
Have Faith in How You Serve - this one was inspired by my dear daughters.  They are volleyball players but God's faithful followers first and I wanted it to be a reminder to them that they are to be a light for Jesus in all they do.

Thanks for checking in, I hope you will share my post, Facebook page and do some pinning for me.  I would feel blessed to be able to make someone smile with my art!
Many blessings to YOU!
Jana

Sunday, June 16, 2013

Happy Father's Day!

Hello!
Long time-no see!  I have been busy as a bee with end of school activities, going to the Great American Scrapbook Convention and now preparing for my yearly scrapbooking retreat that I host every June with 19 of my closest friends and family.
Today I wanted to show you the card that I made for my dad for Father's Day.  I got this precious file from Treasure Box Designs.  It is so stinkin' cute and went together pretty easy.
I used my Make the Cut software and did the whole thing, except the green base by doing a print and cut.  Luckily, the designer colors each piece the color she wants them to be so all I did was set it up as a print and cut, put textured white cardstock in my printer, printed out the pieces and then I put the paper in my Zing and it cut it all out!  I was so excited to be able to do this instead of putting 10 different pieces of cardstock on the mat for all of the pieces. It was very reminiscent of what the Cricut Imagine is SUPPOSED to do but quit doing after I ran an update on it.  With the Zing and MTC you aren't tied to cartridges!!!  FREEDOM!!!!
So all the tiny pieces that you see, including the little letters spelling "dad" and the # we printed on my printer, then cut on my Zing!  I even imported the red and white gingham paper into MTC, applied it to the panels and then print and cut them also!  I love MTC and the amaZing Zing!!!
Here are a few up close views of the card.  My dad really loved it.  My mom makes cards all the time so he can appreciate my efforts :)

My prayer for you is that God has blessed you with a wonderful father.  Not everyone is so fortunate.  When I was growing up I dreamed of meeting a man like my father to marry and God gave me my wonderful husband of 24 years at a time in my life when I needed him most.  Our heavenly Father loves us and wants us to be happy with the men we choose, so I always say, be careful, take your time and choose wisely because God has put that person in our path, we just need to be patient until we run into him.


Tuesday, May 14, 2013

A Late Happy Mother's Day

(I wrote this post ON Mother's Day, saved it to add pictures, then just plain ole forgot to post it!  So, here is a belated post!)

Happy Mother's Day to all my wonderful followers and any visitors that have popped in!  Today I wanted to share with you the two cards that I made for my mother and my mother-in-law.  I could go on and on about how wonderful both of these women are but I won't.  I will say that I have been blessed beyond measure with having both of them in my life to guide me, love me and help me be a better mother to my own children. Blessed beyond belief!
The cards I made are not my own design, at all, not even the decision to what paper to use! :)  I just love the files from SVGCuts.com.  Mary does such a great job and I just love her taste in design and papers that I decided to keep it simple and just copy what she had created.  I even ordered the paper kit she used because I loved it so much.  So the kit from SVGCuts.com is called "Cards for Moms" and can be found by clicking on the image below.
Cards For Moms SVG Kit

The paper kit that she and I both used was called "Farm Girl" from October afternoon and I got mine from Scrapbook.com, I think.  You can google it and find it in many forms, kits, papers, embellishments, 8x8 and 12 x 12.  I got the 12 x 12 kit below.

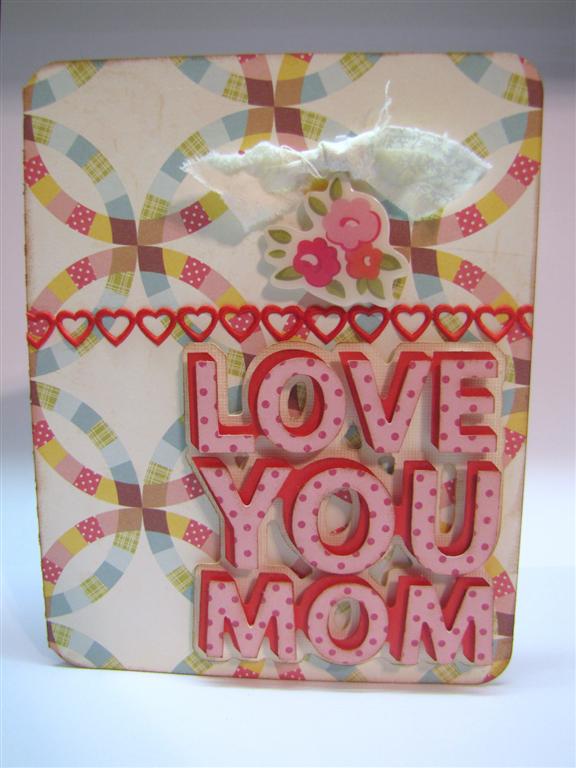
There were many cards to choose from in Mary's kit so I decided to make the "I Love Mom - See through card" and the "Love You Mom Card".  The kit didn't come with all of the embellishments that Mary used so I change them up a bit.  Here is the card I made for MY mom:

 I LOVE buttons!  So I included them just like Mary.  Mary, Mary, Mary, I sound a bit obsessed????
 The cardstock stickers on the front came with the kit and I had the red buttons in my stash.  One thing I love about the svg kit that Mary created is that she has a cut for an insert for the interior of the card which is nice when using double sided paper.  That way you can stamp a sentiment inside and write a message also.

This is the card I made for my sweet mother-in-law:
LOVE the double wedding ring paper!!
Can you use too many pop dots??  I think NOT!!!  you can never have too much dimension, unless you are going to mail it, then I have to reluctantly back off on the popping but I am hand delivering this one!  Late, as usual.  I preferred a red shadow for my letters over the soft pink in the sample, I think it ties it in with the background paper and makes the letters pop more.
I didn't have the cute bottle cap like in the sample so I just used one of the cardstock stickers from the paper kit and then used my diamond glaze to make it look like an epoxy embellishment then added a bow from my stash.  Easy peasy, both cards.  Of course, I have to ink the edges of everything so I used the Vintage Photo ink pad from Tim Holtz.  I hope you like my creations and that you will stop by SVGCuts.com and check out all of Mary's wonderful files.
Oh! and Mary also included envelopes in the files to fit each card so I had to cute them up a bit with the stickers from the paper kit :)

I also wanted to add before leaving, I have changed the way my comments work so that if you ask me a question, I can hit the reply button and answer your question.  I hope it works :)

So I leave you with this verse, something I have pondered upon much this past year.  What is it God wants from me as a mother?  Many blessings to all the mothers out there!

Who can find a virtuous woman? She is far more precious than jewels... 
Strength and honor are her clothing, and she can laugh at the time to come. 
She opens her mouth with wisdom, and loving instruction is on her tongue. 
She watches over the activities of her household and is never idle. 
Her sons rise up and call her blessed. 
He husband also praises her: 
Many women are capable, but you surpass them all! 
Charm is deceptive and beauty is fleeting, but a woman who fears the Lord will be praised. 
~Proverbs 31:10, 25-30

Sunday, December 23, 2012

I'm glad He has plans for me!

Well Christmas is here and amidst all the craziness in this world, the holidays have seemed a little less joyful just recently.  I don't know what my Heavenly Father has planned for my life but I know I can trust Him.  He gives us all free will to make our own choices and I am choosing to listen and follow Him.  It seems so unfair that evil has to even exist in this world but it does and some use their free will for evil.  As the horror unfolded in CT and the fiscal cliff looms, this is what God has laid on my heart.  I created this piece out of trust and faith.  It felt good to be reminded that God is ever watching over us and if we will just trust Him and live within His will, we will be fine. I made it back right after Thanksgiving but decided that passing this message along to someone for Christmas would bring back some joy.  I hope you and your loved ones have a blessed Christmas and that God is who you turn to when times are hard.
Blessings,
Jana


Thursday, November 29, 2012

I'm back!!!!

OK, so 5 months is ridiculous to be gone from blogging, I know, but friends, there has been some changing goin' on 'round here!!!  Life is good and God is good.  So if you remember, last time I was here I had started the Your Living Canvas Workshop with Christy Tomlinson and I told you it was quite the journey and it had spurred some changes in my life.  Well, good bye caterpillar, hello butterfly!  In the time since I last posted here is what has happened:
1. I still haven't finished the workshop - I stopped to begin implementing the change.
2. I quit my full time job to focus more on my family and on the things I feel are most important.
3. I began teaching again, part time for the local museum but out in the schools with 3rd and 4th graders.  I am teaching art and it is AWESOME!!!  I only teach about 5-6 days a month which leaves LOTS of time for family and fun.
4. We started on a new budget :/ that has been hard, fun and rewarding! (did I say fun???)
5. My daughter made the varsity volleyball team as a freshman and I made it to almost all of her games! (Of course, my gas bill for October was $600 but it was awesome to be able to be there for her)
6. I am putting my first bit of art "out there" for publishing.  I will be taking images of 4 pieces I created for friends for Christmas to the printer to create sets of Christmas cards!  I am SOOOO excited.

So, my goal for this project was to sell at least 10 sets so I could justify paying a printer to create the cards.  I was so worried no one would like them but I went for it anyway, with a lot of encouragement from my awesome husband.  I told my friends in our church choir and they told their friends and I posted it on Facebook today and I have sold 22 sets!!!!!  I am so excited about this I can hardly stand it.  So I will be ordering a few more.  Here is what each card looks like.  Details about the card sets follow the pics.


Each set comes with 12 - 5.5 x 4.25 cards that are blank inside.  There are 3 of each above design in each set.  The set is $15 plus shipping.  If you are interested in purchasing a set just email me at janambailey@wtconnect.com with your address and I will send you a Paypal invoice.

Hopefully someday soon I will be selling things through an Etsy shop and maybe even here on my blog.  Something I will be working on in the near future.

I will be posting more projects, artwork and such as I am on a bit of a creative binge for Christmas and I would love to share with you.  I hope you will visit again and tell your friends about Raining Grace because baby it's pouring right now!!!!
Blessings,
Jana

Monday, March 5, 2012

WhooHooo! Blog Award!

What a great week it has been.  I have been chosen by two wonderful blogger friends for the Liebster Blog Award. First by my sweet design team sister Amanda from Crick'tn Crafts and then from Misty at Sevens... I feel very blessed to have been chosen for this award.  I hope you will visit their blogs and see what great things they have to offer you in the way of great deals and great inspiration.

"Liebster" is German for "Dearest" and the award is given to an inspirational blogger with 200 followers or less.  So thank you Amanda and Misty!  I try to inspire and I see that you appreciate it :)
I am supposed to now pass on the love by doing the following:


1. Thank your Liebster Blog Award presenter on your blog.
2. Link back to the blogger who presented you the award .
3. Copy and paste the award on your blog.
4. Present the Liebster Blog Award to 5 bloggers with less than 200 followers.
5. Let them know they have been chosen by leaving a comment on their blog.
So here are my 5 bloggers...
 
1. Letilla at http://divaof5.blogspot.com
2. http://upstairsinthescraproom.blogspot.com
3.  http://thecraftydream.blogspot.com

I am currently working on finding others that I think are deserving of this award.  I'll update soon! :) I am having too much fun visiting all the blogs I follow since I have not had time to do so in a long time!


4.
5.

Monday, February 13, 2012

Cricut Cartridge Challenge Day Two!

Ok, I am so sorry my post is so late tonight.  I just finished helping the 5th grader in my house make her valentine box, it is a large blue guitar???  What ever happened to pink and red hearts????  Then the 8th grader had to have paper mustaches for the lollipops she is giving to her friends.  Of course that meant an hour in the Cricut Craftroom figuring out how t o purchase a digital cartridge.  Which I ended up buying twice?  Some where in there we had tryouts for little dribbler basketball which I ended up getting volunteered to coach again this year.  Cookies baked, laundry only half done, kitchen cleaned, what else....oh yea!  Cricut projects!!!!
I have had so much fun with this weeks challenge of using a Cricut cartridge I have had for a while but not used much to make a project each day.  I have chosen to use Forever Young, it is the perfect match to the K. Andrew stamp set Fashionable Friends.  It has been a lot of fun and thanks to YouTube for great inspiration. This card idea came from StampTV on YouTube.  I hadn't made a "gate card" before so I thought I would give it a try and given the kind of day I've had, it looked simple enough :)
This card is 5 x 7 finished so I cut the cardstock 10 x 7 and scored it 2 1/2 inches from each side so that it folded and met in the middle.  I used blue paper from my stash and then colored the cuts from Forever Young with colors built into my imagine.  I love the sentiment from Fashionable Friends.  Kristal Andrew is such a great stamp designer.  Go HERE to check out her great stamps.  The best thing is that you get a great set of stamps but even better is she donates to a charity for every purchase made from her.  She is so generous!
 So the lady on Stamp TV said it was a gate card "with a twist" and at first I couldn't figure that out but then as she put the two panels on the front I saw what she meant.  She attached the top one on the right and the bottom one on the left so that they kind of interlock when you open and close it.  Cute and simple!
I just love these shoe cuts.  These are cut at like 1 1/2 inches and the Imagine makes a perfect cut.  Love it!!!!  Here is the stamp set that I used.  Feel free to hop over to K. Andrew Designs and pick one up for yourself!
K Andrew Designs

Also don't forget you can link up your Cricut and K. Andrew design below.  Share your talent, get more hits on your blog, have fun and play with us!  :)

Saturday, October 29, 2011

Freebie Friday a Day Late :0)

Well, last week was a wild one and I thought for once I was gonna have my act together but apparently not!  I am just now getting my post done for yesterday!  Oh well, at least it is done.

It's Freebie Friday at Jen's Digi Stamps Blog and it is a cutie!  I used the stamp to make an ornament.  I printed it two times, one I flipped then colored them both.  Then I just added a bow, wire for the antennae and a string to hang it.  When I glued them back-to-back I made sure not to glue the wings together so that I could separate them so it looked like he was flying.

 I have a little tip for projects that you color then cut out.  Try to cut right on the black out line then after you are finished cutting, take your black marker and lay it on the side of the cut and run it along side the cut edge.  That will make the white edges black and it helps cover up your cutting mistakes!  I do this with all my cuts.
I hope you enjoy the little critter.

I wanted to also remind you that the image is still available on the blog.  All you have to do is right click on it and choose "save image..." and choose where you will store it on your computer then you can insert it into a blank document and print it out any size you want!

I thought it would be neat for teachers to add it onto notes home or on worksheets or even make cute little Christmas cards for their students.  Just a few of many ideas I am sure you can come up with!
I hope you are enjoying a relaxing Saturday.
Blessings,
Jana

Monday, October 24, 2011

Polka Dot Challenge

Today is challenge day at Jen's Digi Stamps.  If you go to her blog then you can read about the challenge, link up your project for a chance to win a prize and see what the other design team members have created.  This is my project for the Polka Dot Challenge.  now I have to say, I am disappointed in myself.  I LOVE polka dots.  Polka Dots on anything and everything!!!  And LOTS of them!  But I fell a little flat on this one because I was trying to create a different type of card.  It is a spinner card.
 I bought a new book at Michael's that was on clearance called Interactive Cards by Tanya Fox.  It is an "Annie's Attic" book.  If you google spinner card, you can find directions to make them.  It is really quite easy and fun. The sentiment was stamped with one of K. Andrew Designs stamp sets called "Winter Wishes".  It is a mix-n-match set so there are a ton of uses for it.  Plus I really like buying from her because she donates to great charities with every single stamp set purchased.  Great girl!
 I used one of Jen's Digi Stamps and after coloring it, I cut it out and apart so there were two pieces, the puppy and the snowman.  Since the puppy has swiped the snowman's arm, I thought it would be funny if her were to "grab it and run!"  So the slider come in to play.
BTW, the inspiration for the coloring on the puppy was my dog Tiki.  Cutie pie!!!
Anyway, back to the project.....The puppy is attached to a penny that is stacked on a foam pop dot and then stuck to another penny.  When you tilt the card, the puppy spins across it with the snowman's arm trying to "get away"!  It cracked me up.  I need to make videos so I can show you how these work.  Maybe I will try one some day.  There are so many out there, not sure why I would want to compete but it might be kind of fun.

So how is this a challenge you ask?  You are challenged to create a project using polka dots!  Easy peesy!  Then just head over to Jen's blog and link it up for a chance to win.  It's very simple indeed!  I hope you will choose to play along.  If not, at least check out the other projects that our design team has posted on Jen's blog, they are very cute!

I have entered my card in a number of other challenges also - check out these challenge blogs:
foreverfriendschallengeblog.blogspot.com
4craftychicks.blogspot.com
ppp-makeitmonday.blogspot.com
ooh-la-la-creationschallenges.blogspot.com
Have fun!
Blessings,
Jana

Thursday, October 6, 2011

If the Broom Fits...

This saying cracked me up!!!  It is a stamp from My Pink Stampers Halloween set called "Spook-alicious".  I had never bought any of the cute stamp sets that all the wonderful bloggers out there make so I decided I was going to buy some so I will be sharing some projects made with them in the future.

The other new thing I did with this project was try out the Copic markers I have been spending so much money collecting.  I use them a lot, but not necessarily for their intended purpose of drawing and coloring in images.  So I downloaded a digi stamp.  What is a digi stamp you might ask ? (don't feel dumb, I didn't know either) Well, it is basically an image that is black line, which makes it look just like a rubber stamped image but it is downloaded  and printed out.  The advantage of using digi stamps is that the image can be manipulated, flipped, rotated, and re-sized, unlike the rubber counterpart.  To learn more about digi stamping you can click here.

Now, I want to clarify...this is NEW to me, so I don't pretend to be an expert, I just wanted to share it with you.  The digi stamp in my card is from Jen's Digi Stamps.  It is the first one I have ever downloaded and colored.  My first attempt at coloring was not the best and this is only my second attempt so I still have a lot to learn about my Copic markers.  I really like coloring, have all my life, so this should be a fun adventure!

So here is my project. I would REALLY like to know what you think.  I am considering entering it into a design team challenge but would not want to make a fool of myself!  :)
 Everything I used came from my stash.  Things I have had around FOREVER!  The only new thing would be the baker's twine.
 Pardon the lighting. I usually do my photographing during the day with natural light but was eager to share this with you.
Close up of my coloring.  Still need some work I know.  Hey! If you know of any good YouTube videos that teach about coloring with Copics, let me know!  No one around here teaches the classes so I have to rely on the internet.

One more thing before I leave.  If you would like to try some digi stamps, there are tons of free ones on the web but I would like to ask you to stop in at Simply Betty's Stamps.  She does some really cool stamps and her family is going through quite a crisis right now and could use your prayers and a few sales to help them out.  Click on the link to read her story and check out her traditional stamps and digi stamps.
Blessings,
Jana

Sunday, August 7, 2011

Chef Thank You Card

Hi everyone!  We are about to leave on vacation...I am so excited...off to the beautiful Rocky Mountains on a much needed get away with my family.  But I just could not leave town without making another project inspired yet again by the Peachy Keen Challenge Blog.  It is another Let's Face it Friday challenge and this time it is a shaped card.  Here are the challenge details:

-----------------------------
THE CHALLENGE
-----------------------------
Create a shaped card using PKS faces. No die cutting machine? No problem! Use a corner rounder to create a subtle shape or half of a large die to create your shape.

THE RULES:
  • Project must be new
  • Must incorporate Peachy Keen Faces
  • Please link directly to your blog post (not blog address)
  • Link by 8/18 - 11:59 pm CDT
Here is my entry:
 This is a thank you card for the great chefs from Texas State Technical College Culinary Institute for teaching the summer kids cooking camp for the museum where I work.  They did an outstanding job and the kids just loved them!
 I used several "thank you" stamps that I had and embossed the front using the jade embossing powder from Stampendous.
 And of course, the cutest faces around...Peachy Keen Everyday Character Faces.  They take the card to another level that no other stamps can get close too!

In order to make it a shape card for the challenge, I cut the paper dolls out two times each and the bowl out 3 times.  After I assembled the front pieces of the card and got them all glued together, I then turned the card over and I laid the second body cuts on the backs of the front ones and made sure they were lined up on the back.  I used a ruler to mark a horizontal line for folding and then  scored the line that I drew and folded the tops of the paper doll heads. 
Here is what the heads looked like once I scored and folded them.  Then I put just a touch of glue on the part that is folded up and then lined them up again on the back of the card and glued the tops down.
Once the bodies were glued to the top of the card, I refolded the card to make sure it would move correctly and then I glued the next bowl onto the legs of the bodies, glued their hands together and any other part that needed to be glued so that it became one piece.
The third bowl I mentioned was glued to the back of the card front so when you open the card, it looks a little neater.  As I look at the back, I think I am going to cut the bowl one more time and cover their legs in the back so that it looks like they are inside the bowl from every angle.  Here is the recipe:
  • 4 bowls - Create a critter - pg. 58 cut at 5.0" - 1 bowl was filled with a pattern from Imagine Hopscotch - the rest are left white
  • 4 chefs and accessories - Everyday Paperdolls - pg. 72/73 cut at 4.0 - 2 were colored with Imagine Hopscotch color palette and the other two left white
  • PK 490 Everyday Character Faces from Peachy Keen Stamps
  • White enamel accent for buttons

I hope you like this card, I had fun making it and it went together really fast.  now I realize some of you that are real whizzes with your Gypsy could create a great file for this so that the back of the card is cut in one piece.  I kind of winged it and made it as I went along.  Thanks for stopping by and I hope you have a blessed Sonday!
Later!
Jana

Wednesday, July 27, 2011

Peachy Keen Stamps :: Sketch Challenge 57 w/a Twist!

Hey everyone! I'm back already with my newest addiction...Peachy Keen Stamps!  This time it is a sketch challenge.  You can check out their challenge page on the Peachy Keen blog if you want to be challenged yourself!

Here is the challenge, copied from the blog...


  • Create a card based on the layout provided (Peachy Keen Stamps are not required for this challenge, but if you've got them, we looooove seeing how you create with them!) 
  • Project must include basic elements from the sketch, and color combo!

Not too hard, so I decided to keep it simple.  Here is what I came up with...
I cut the card 4 x 6 to begin with.  Now the really fun part.  I used a free program that I downloaded from the internet to get the EXACT colors from the color swatch above.  It is called "Color Cop," a free multipurpose color picker.  Someone on the Cricut Message Board told us about it (not sure who the original poster was that mentioned it, and I won't go into the little tiff that broke out over "who was the first to mention it"...crazy!)  Any whoo...after you download this neat little program, you open it and take the little eye dropper and hover over the color swatch and it tells you the exact RGB code of the color and you enter it in your Imagine and TADA!!! you print and cut with the exact colors!  This makes me giddy it is so cool :)
To enter the RGB (red, green, blue) numbers you click on the image, then the little edit pencil and then in the color palette below the image there is a square with a rainbow and a down arrow, click it and you will see the place at the bottom to enter the codes.  IT IS SO COOOOOL!  This is a HUGE reason I love my Imagine.  The card above was made with white cardstock.

And of course I had to stamp on a cute little Peachy Keen face.  The two large volleyballs were cut from Sports Mania at 1.5" and the three small ones were cut at 1.2".  I cut the "I dig" from the same cartridge at 1" and then I inked all the edges, because that's the way I roll! :D
 
Now for the volleyball net in the background.  I had this cool stuff in my stash for ages.  It is called Magic Mesh and I don't know if you can even get it anymore.  I got it from Leaving Prints, a direct sales scrapbook company I used to work for which no longer exists :(.  It is sticky on one side and I inked the non-sticky side to make it black-ish because it was white.  Then I just cut 1/4" strips for the tape across the top and bottom.
On the inside I cut the "YOU" using the Varsity Letters Lite cartridge from Walmart and cut them at 1 1/2".  I really like the way it turned out and I hope you do also.
Stop by Peachy Keen Stamps blog and join in on the challenge fun!  It will get your creative juices flowing. Now I am off to link my project on the challenge blog.  Have a blessed day!
~Jana